Detailed Explanation of the Construction Process of HPL Dry-Hanging Wall Panels
HPL dry-hanging wall panels are widely used in modern commercial interiors, public buildings, healthcare spaces, schools, offices, hotels, transportation hubs, laboratories, shopping malls, and high-traffic wall cladding projects. Compared with traditional painted wall finishes or ordinary woodworking panels, HPL dry-hanging wall panels offer better durability, impact resistance, moisture resistance, design consistency, and paint-free maintenance.
However, the construction process of HPL dry-hanging wall panels is more precise than ordinary decorative wall panel installation. Because HPL panels and phenolic laminate boards have high hardness, high density, and strict dimensional requirements, the project must control panel processing, layout drawings, keel structure, hanger positioning, expansion gaps, seam treatment, and final inspection.
This guide explains the complete HPL dry-hanging wall panel construction process, including material preparation, measurement, factory processing, keel installation, panel hanging, joint treatment, cleaning, inspection, and key installation precautions.
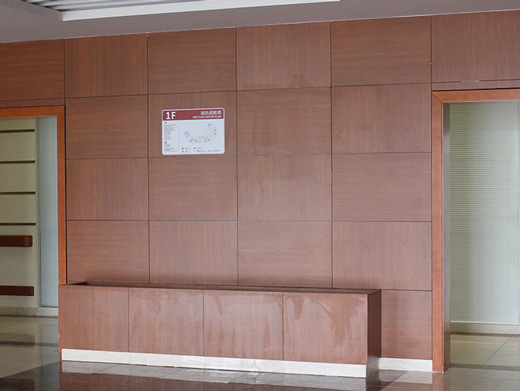
What Are HPL Dry-Hanging Wall Panels?
HPL dry-hanging wall panels are decorative wall cladding panels made from high pressure laminate or phenolic compact laminate, installed on a supporting keel or substructure system instead of being directly pasted to the wall surface. The dry-hanging method uses mechanical fixing, hangers, keels, grooves, brackets, or concealed clips to support the panels.
This installation method is especially suitable for projects that require removable wall panels, precise joints, hidden pipelines, better wall flatness, fast maintenance access, fire-resistant interior surfaces, and durable paint-free wall decoration.
Main Advantages of HPL Dry-Hanging Wall Panels
Exceptional durability: HPL wall panels resist impact, abrasion, scratches, moisture, and temperature changes in high-traffic interiors.
Paint-free surface: The decorative finish does not require painting, reducing odor, drying time, repainting, and long-term maintenance.
High design value: HPL panels are available in wood grain, stone, metal, solid color, matte, textured, and custom decorative surfaces.
Better wall flatness: The keel system can help correct uneven base walls and create a more precise finished surface.
Maintenance access: Dry-hanging systems can allow easier replacement of individual panels when the fixing design supports removability.
Expansion control: Proper panel gaps and fixing details help accommodate thermal and humidity-related movement.
Where Are HPL Dry-Hanging Wall Panels Used?
| Application Area | Why HPL Dry-Hanging Panels Are Suitable |
| Hospitals and Healthcare Facilities | Easy cleaning, impact resistance, hygienic surface options, and durable wall protection |
| Schools and Universities | Strong resistance to scratches, impact, frequent contact, and long-term public use |
| Hotels and Office Buildings | Decorative finishes, clean wall lines, premium interior appearance, and low maintenance |
| Shopping Malls and Retail Spaces | High design flexibility, fire-resistant options, and durable commercial wall cladding |
| Laboratories and Public Facilities | Moisture resistance, chemical-resistant options, cleanability, and panel replacement flexibility |
| Transportation Hubs | Impact resistance, fire-rated wall surfaces, and stable performance in high-traffic areas |
Construction Process Overview for HPL Dry-Hanging Wall Panels
| Step | Main Work | Key Control Point |
| 1 | Site survey and measurement | Confirm wall dimensions, corners, openings, and connection details |
| 2 | Layout and shop drawings | Prepare panel layout, joint positions, processing drawings, and material schedule |
| 3 | Factory panel processing | Use CNC cutting, grooving, drilling, and tolerance control |
| 4 | Keel structure installation | Control keel spacing, verticality, flatness, anti-corrosion, and fixing strength |
| 5 | Hanger positioning | Mark and fix hangers accurately according to drawings |
| 6 | Panel hanging and alignment | Install from bottom to top, align joints, and check flatness row by row |
| 7 | Joint finishing and protection | Maintain expansion gaps, use silicone sealant or finishing strips, protect panel surfaces |
| 8 | Final inspection and cleaning | Check alignment, seam width, fixing stability, surface cleanliness, and finished appearance |
Step 1: Site Measurement and Wall Condition Inspection
Accurate measurement is the foundation of HPL dry-hanging wall panel installation. Before factory processing, the construction team should measure the actual building dimensions, including wall length, wall height, corners, columns, beams, windows, doors, ceiling lines, floor level, pipe positions, electrical openings, and junctions with other materials.
Check the flatness and verticality of the base wall.
Confirm whether the wall can support the dry-hanging keel system.
Identify all openings, equipment positions, and service access points.
Mark material transitions with ceilings, floors, stone, glass, doors, and metal trims.
Record site deviations and update drawings before panel fabrication.
Step 2: Layout Drawings and Panel Processing Drawings
Because HPL wall panels have high hardness and strict dimensional requirements, the layout should be finalized before factory cutting. A detailed layout diagram and corresponding panel processing drawings help reduce on-site cutting, installation errors, material waste, and joint inconsistency.
Prepare elevation drawings for each wall surface.
Define panel size, orientation, grain direction, pattern matching, and seam layout.
Confirm opening positions for sockets, switches, access panels, pipes, doors, and windows.
Use CAD or BIM coordination to optimize material utilization and visual symmetry.
Confirm edge details, grooves, hanger holes, tongue-and-groove positions, and fixing points.
Step 3: Factory Processing of HPL Wall Panels
All panel processing should be completed in a factory setting using specialized tools. General woodworking tools are not recommended for precision HPL panel processing because they may cause edge chipping, inaccurate grooves, surface damage, or dimensional errors.
CNC cutting, CNC grooving, drilling, tongue-and-groove processing, edge finishing, and hanger hole machining should follow approved drawings. For high-quality projects, the processing tolerance should be tightly controlled, commonly within approximately ±0.5mm where the design requires precise panel alignment.
Factory Processing Requirements
Use CNC cutting and grooving machines for accurate panel dimensions.
Use sharp carbide tools suitable for HPL or phenolic compact laminate.
Check each panel against the processing drawing after machining.
Protect panel corners and decorative surfaces during packing and transportation.
Label panels clearly according to wall number, installation sequence, and panel position.
Step 4: Keel Structure Installation
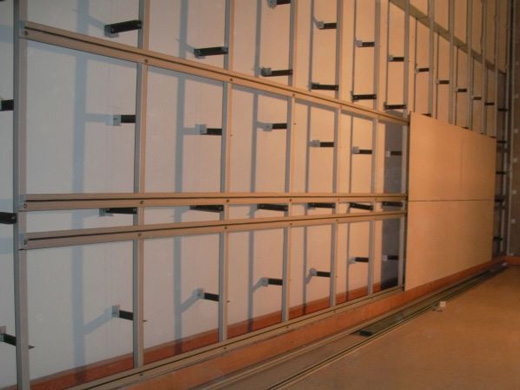
The keel structure is the skeleton of the HPL dry-hanging wall panel system. It supports the panels, corrects wall flatness, controls alignment, and transfers panel load to the building structure. The quality of the keel directly affects the final flatness, joint consistency, and long-term stability of the wall panels.
Main and Secondary Keels
A light steel or aluminum keel structure is commonly used. Horizontal and vertical keels should be installed according to the project design, panel size, wall height, fixing method, and load requirements.
Horizontal keel: Aluminum alloy U-shaped keel, such as L56×3mm, with spacing generally no more than 500mm according to project design.
Vertical keel: Galvanized square steel tube or aluminum square tube, such as 40×20×2mm, with spacing generally no more than 600mm according to project design.
Connection method: Horizontal and vertical keels should be connected with bolts, adapters, brackets, or approved fixing accessories.
Anti-corrosion treatment: Hot-dip galvanized keels or aluminum profiles are recommended; welded joints should be treated with anti-corrosion paint.
Keel Installation Control Points
Use laser levels, theodolites, plumb lines, or alignment tools to control horizontal and vertical accuracy.
Ensure the keel system is flat, stable, and securely fixed to the building structure.
Add reinforcement around doors, windows, corners, heavy panels, equipment openings, and impact-prone areas.
Confirm that the keel position matches the panel hanger and groove position before panel installation.
Step 5: Dry-Hanging System and Expansion Gap Design
The dry-hanging system uses hangers, U-shaped fittings, brackets, grooves, rails, clips, or mechanical fasteners to connect HPL wall panels to the keel structure. Unlike direct adhesive installation, the dry-hanging system must allow controlled movement of the panel and the substructure.
Hanger and Fixing Design
Attach U-shaped hangers or approved fixing accessories to the horizontal keel.
Mark and drill hanger holes on the panel back according to the approved processing drawing.
Secure hangers firmly while avoiding over-tightening that may restrict panel movement.
Keep hanger positioning error within the project tolerance, such as ±0.5mm for precision installations.
Expansion Gap and Joint Control
HPL panels expand and contract with temperature and humidity changes. For dry-hanging wall panels, joint width and expansion space must be designed before installation. A vertical gap of about 4mm between panels is commonly used in this type of system to accommodate movement and reduce temperature-induced stress.
Leave consistent panel gaps according to panel size, environment, and design requirements.
Do not force panels tightly together without movement allowance.
Use silicone sealant, finishing strips, shadow gaps, or metal trims according to the design style.
Check all joints after each installation row to avoid accumulated deviation.
Step 6: HPL Panel Installation Sequence
Panel installation should follow the approved layout drawings and panel labels. The typical installation sequence is from bottom to top, from edges toward the center, or according to the designed control axis. The exact sequence should be adjusted based on wall shape, joint layout, access openings, and site coordination.
Panel Hanging Procedure
Check the panel number, direction, surface finish, and edge condition before hanging.
Install the first row carefully because it controls the alignment of the following rows.
Engage the hangers, grooves, clips, or rails according to the fixing system design.
Use the tongue-and-groove system or plug inserts where required for vertical alignment.
Check flatness, verticality, horizontal seams, and joint width after each row.
Adjust small deviations immediately before installing the next panel section.
Important Installation Precautions
Do not hammer directly on the decorative surface.
Use soft pads or protective films when adjusting panel position.
Avoid dragging panels across floors or other panels.
Protect installed panels from other trades during construction.
Do not remove protective film too early if the site is still dusty or unfinished.
Step 7: Finishing, Joint Treatment and Surface Protection
After the panels are installed, joint finishing and surface protection are required to improve the final appearance and reduce construction contamination. The treatment method should match the design style and movement requirements of the HPL wall panel system.
Treat 4mm black gaps with silicone sealant, finishing strips, metal trims, or shadow gap details as specified.
Use neutral sealant where flexible joint movement is required.
Check the consistency of vertical and horizontal seams across the full wall surface.
Apply protective plastic film to areas prone to contamination during ongoing construction.
Clean adhesive marks, dust, fingerprints, and construction residue promptly with suitable methods.
Post-Installation Inspection and Cleaning
Final Inspection Checklist
Check wall panel flatness, verticality, and horizontal alignment.
Confirm seam width consistency and joint straightness.
Check whether all panels are securely attached to the keel system.
Inspect panel edges, corners, grooves, trims, and sealant lines.
Confirm that the surface has no cracks, chips, scratches, stains, warping, or loose panels.
Verify that openings for switches, sockets, vents, doors, and access panels are accurate and clean.
Cleaning Method for HPL Wall Panels
Remove surface contamination using a neutral detergent and soft cloth.
Avoid abrasive cleaners, steel wool, hard scrapers, and strong solvents.
Clean dust and fingerprints after removing the protective film.
Follow the HPL manufacturer’s maintenance instructions for special stains or chemical exposure.
Important Construction Considerations
Material Quality and Authentic HPL Panels
Beware of low-quality or counterfeit HPL panels that imitate authentic products. Poor-quality panels may have weak density, unstable color, poor fire performance, edge defects, low impact resistance, and shorter service life. Source panels from reputable HPL manufacturers and request technical data, samples, and test reports when needed.
Temperature, Humidity and Movement Control
HPL panels expand and contract with temperature and humidity changes. The dry-hanging method can accommodate this movement when panel gaps, hanging points, joint details, and fixing methods are correctly designed. Do not ignore expansion gaps or force panels into tight joints.
Professional Tools and Skilled Installation
Only suitable tools and equipment should be used for processing HPL panels. Precision cutting, CNC grooving, accurate drilling, stable keels, and skilled installers are essential to achieve clean seams, accurate panel alignment, and a durable finished wall system.
Coordination with Other Trades
HPL dry-hanging wall panel construction often overlaps with electrical, HVAC, ceiling, flooring, door, glass, and metal works. Coordinate construction sequence carefully to avoid panel contamination, repeated dismantling, inaccurate openings, and damage from other trades.
Common Installation Problems and Solutions
| Problem | Possible Cause | Solution |
| Uneven wall surface | Keel structure is not aligned or base wall is uneven | Adjust keel flatness with laser level or theodolite before panel hanging |
| Inconsistent panel gaps | Incorrect layout, cumulative installation error, or inaccurate processing | Check panel labels, use spacers, and inspect each row before continuing |
| Panel edge chipping | Wrong cutting tool, dull blade, or poor factory processing | Use CNC cutting, sharp carbide tools, and proper edge protection |
| Loose panel | Weak hanger fixing, wrong keel spacing, or poor connection details | Recheck hanger position, bolts, brackets, keel strength, and panel load support |
| Warping or buckling | No expansion gap, tight fixing, unstable temperature, or moisture imbalance | Provide movement gaps, avoid over-tightening, and control site conditions |
| Surface scratches | Poor handling, early removal of protection film, or other trades damaging panels | Use surface protection, soft pads, and construction sequence control |
Conclusion
HPL dry-hanging wall panels combine modern panel technology with durable interior design. They provide paint-free decoration, high surface strength, easy maintenance, rich design options, and reliable performance for commercial and public building interiors.
A successful HPL dry-hanging wall panel project depends on accurate site measurement, professional layout drawings, factory CNC processing, stable keel installation, precise hanger positioning, correct expansion gap design, careful panel hanging, proper joint treatment, and strict final inspection.
By following a controlled construction process and using high-quality HPL panels, contractors and designers can achieve a durable, clean, removable, and visually striking wall cladding system with long-term project value.
FAQ About HPL Dry-Hanging Wall Panels
What are HPL dry-hanging wall panels?
HPL dry-hanging wall panels are high pressure laminate or phenolic compact laminate panels installed on a keel or substructure system using mechanical fixing, hangers, clips, brackets, or grooves. They are used for durable decorative wall cladding in commercial and public interiors.
What is the difference between dry-hanging and adhesive installation?
Dry-hanging uses a mechanical keel and fixing system to support HPL panels, while adhesive installation bonds panels directly to a substrate. Dry-hanging is better for removable panels, hidden services, uneven base walls, larger panels, and projects requiring movement control.
Why should HPL wall panels be processed in the factory?
HPL panels are hard and dense, so factory CNC processing provides more accurate cutting, grooving, drilling, and edge quality than ordinary on-site woodworking tools. Factory processing reduces installation errors, edge chipping, material waste, and joint inconsistency.
What keel structure is used for HPL dry-hanging wall panels?
A light steel, galvanized steel, or aluminum keel structure is commonly used. Horizontal and vertical keels support the panels and control wall flatness. Keel size, spacing, fixing method, and anti-corrosion treatment should follow project design and panel load requirements.
How much gap should be left between HPL wall panels?
The gap depends on panel size, material movement, temperature, humidity, and design requirements. In many HPL dry-hanging wall panel systems, a vertical gap of about 4mm is used to accommodate expansion and contraction while maintaining a clean joint appearance.
Can HPL dry-hanging wall panels hide pipes and cables?
Yes. The space between the base wall and the dry-hanging panel system can help hide selected pipes, cables, and service routes. However, access panels, safety requirements, fire codes, and maintenance needs should be considered during design.
Are HPL dry-hanging wall panels suitable for hospitals and schools?
Yes. HPL dry-hanging wall panels are suitable for hospitals, schools, universities, public buildings, and high-traffic corridors because they provide impact resistance, easy cleaning, decorative flexibility, and durable wall protection.
How do you inspect HPL dry-hanging wall panel installation?
Inspection should include wall flatness, verticality, panel alignment, seam consistency, fixing strength, keel stability, edge quality, surface scratches, joint treatment, opening accuracy, and final cleaning. Problems should be corrected before project acceptance.
How should HPL dry-hanging wall panels be cleaned?
Use a soft cloth and neutral detergent for routine cleaning. Avoid abrasive cleaners, steel wool, hard scraping tools, and strong solvents unless approved by the manufacturer. Proper cleaning helps maintain the decorative surface and long-term appearance.
What should buyers confirm before ordering HPL wall panels?
Buyers should confirm panel thickness, surface finish, fire rating, moisture resistance, layout drawings, processing tolerance, hanger system, keel design, joint width, packaging, delivery sequence, installation guide, and supplier experience with HPL wall cladding projects.
 Русский
 English
 العربية
 Français
 Español
 Português
 Deutsch
 italiano
 日本語
日本語 한국어
한국어 Nederlands
 Tiếng Việt
 ไทย
ไทย Polski
 Türkçe
 አማርኛ
አማርኛ Bahasa Melayu
 தமிழ்
தமிழ் Filipino
 Bahasa Indonesia
 magyar
 Română
 Монгол
 қазақ
қазақ Српски
 हिन्दी
 فارسی
فارسی Kiswahili
 Slovenčina
 Slovenščina
 Svenska
 українська
 Ελληνικά
 Suomi
Suomi Հայերեն
 עברית
עברית اردو
اردو Shqip
Shqip বাংলা
বাংলা Hrvatski
 Afrikaans
 Māori
Māori සිංහල
සිංහල Oʻzbekcha
 latviešu
 Беларуская мова
 Bosanski
 Български
 ქართული
 Lietuvių
 Malti
Malti Runasimi